|
Cutthroat Frame Assembly and Rigging InstructionsWARNING: Because of the
lightweight nature of the frame, damage can result from normal use if the frame
is not strapped down properly. New models have spreader bars to reduce this
problem.
There is a new mesh seat that is installed with cam straps on the seat. To see the frame rigged up with the new seat upside down, please follow this link. Identify the parts that were shipped with your frame
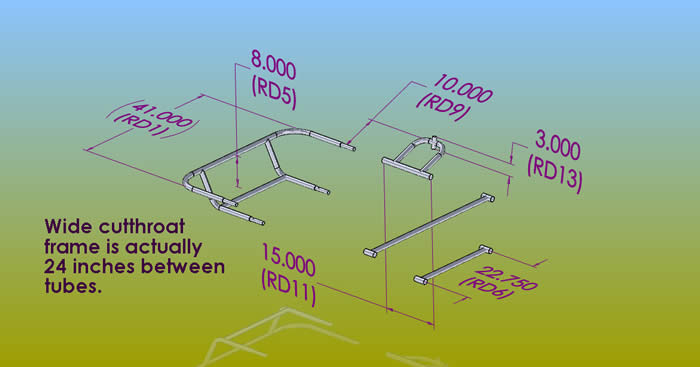
What is not easy to see in this illustration is that the oar stands and spreader bars slide on top of the top longitudinal rails, and the floor mesh and bottom spreader bars slide on the bottom longitudinal rails. The longitudinal rails are the long tubes that go between the frame ends.
This image shows one frame end, an oar stand, a top spreader, and a bottom spreader bar without the seats, floors, top rail, bottom rail, or pillows The Cutthroat 1 includes: 1 long and 1 short spreader (cross member) spreader bars, 2 frame ends, 2 top and 2 bottom extension tubes (5 ft long), 2 mesh floors, 1 mesh seat with 4 cam straps, 2 oar stands, 6 long straps and 6 short straps, 10 bolts, Two 12 ft long inflatable tubes, and 1 back rest pillow with two straps attached. The cutthroat 2 includes: 1 long and 1 short spreader (crossmember) spreader bars, 2 frame ends, 2 top and 2 bottom extension tubes (7 ft long), 3 mesh floors, 2 mesh seats with 4 cam straps each, 2 oar stands, 8 long straps and 8 short straps, 10 bolts, Two 14 ft long inflatable tubes, and 2 back rest pillows with two straps attached. If you did not get all of these parts, please contact JPW INC immediately so we can send the missing parts out to you. Tools that you will need 2 wrenches (box end open end or socket) for a 1/2 inch bolt head and nut. Step 1 Arrange the parts:
Step 2 Installing the mesh seat, the mesh floors, the seat strap,
and spreader bars: Step 3 Bolting the frame together: Step 4 Install the backrest pillow:
Step 5 Inflate the tubes and strap
the tubes to the frame: Please note these special features on the cutthroat: • The pillow is intended to wrap around the operator’s hips. This technique gives hip support by wrapping around the hips when the pillow is deflated. Proper lumbar support can be achieved by pushing back into the pillow while air is slowly escaping out of it. Tighten the valve when it feels good. It is not necessary to use the pillow. A substantial gear load or a Paco Pad can also give good back support. We are proud to offer the most comfortable personal adventure craft on the market. • Frame deflection on the bottom
tubes may be an issue if this boat is carrying a heavy load. Limit bottom
extension tube frame deflection with straps tied between the top extension tube
and the bottom extension tubes. It is a good idea to use straps between
extension tubes or spreader bars when not using bolts in the bottom extension
tubes. This will keep the bottom part of the frame from distorting.
· Seven ft oars add a large amount of stability to this craft. However, this boat can access very remote and small streams because a kayak or two canoe paddles can be used where the streams are too narrow for oars. Oar geometry can be changed by using 6 ½ ft oars to bring the handles up higher. Oar geometry can be changed by adding a spacer (5/8 inch ID bushing available at the auto parts store) to the top of the oar lock stand. • To make the cutthroat 1 a two person craft, simply add another mesh seat to the back of the frame, or sit on top of a deck board a dry bag, or cooler. Place the top spreader bar near the middle of the frame to keep the frame from deflecting. • Two mesh floor sections are included with each frame set. Arrange them to carry gear, as a platform for the operator to stand for better visibility, or move them out of the way so that it is easy to access the river bottom. Bottom floor sections now have a cut out so you can slide them all the way up to the front cross member, and still install the assembly bolts in the bottom extension tubes. The journey is much more important than the destination. After all the destination is just another take out. We think that the cutthroat will afford our customers a grand experience during the journey. We want to hear from our customers. Please write about the adventures that you have with these boats. Our email address is info@jpwinc.com |
Order inquiries: shop.jpwinc@gmail.com © 2011 Jack's Plastic Welding, Inc
|
|


